how to draw 3d in corel draw
This brief written tutorial shows you lot how to use some simple tools to create dynamic, three-dimensional objects in CorelDRAW.
This tutorial discusses:
- Using the Blend tools improved capacity in recent versions of CorelDRAW
- What a Alloy is and how to create them in CorelDRAW
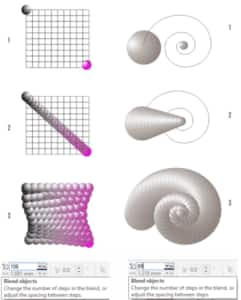
- How to create three-dimensional objects using the "Blend along full path" command
TheBlend tool is a long-known CorelDRAW tool but its functionality has been improved over the past few years, specifically in the more interactive way in which blends are applied to objects.
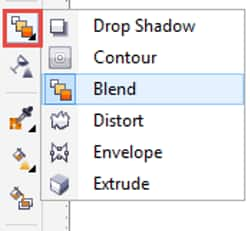
A blend is like a metamorphosis or morphing between two objects.
Y'all volition need two objects in gild to create a blend. One will exist the starting indicate and the 2d will become the terminate signal of the alloy. The alloy is in fact a progression of overlapping objects forth a path. The shape, as well as the make full and outline of the objects, are progressively modified to accept on the shape of the selected starting and ending objects.
TheBlend tool is one of the well-nigh versatile tools in CorelDRAW, that'south why it's very useful to understand its ability. To help you observe it, let's create a simple 3D-result using theAlloy tool.
To start, you must create all the elements that volition be "blended". Using theEllipse Tool draw two circles and apply aradial fountain fill to them.
Then, using theFreehand Tool draw a path that will function as the blend trajectory.

In one case all the elements have been created, select theBlend Tool and left-click on the left circumvolve. Then, without releasing the mouse push elevate the cursor and position it over the second circle. Release the mouse push and the alloy is practically done.

Select the composite group and click on theNew path icon in theBlend Tool property bar. The cursor will change into a wavy blackness pointer.
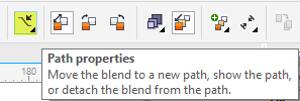
Click on the path that you had previously drawn and the alloy volition take on the shape of this path.

If you want to obtain a more elaborate appearance, select the new composite group and click on theMore than blend options in the property bar. Enable theAlloy along total path check box.
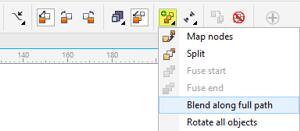
The objects will at present go automatically distributed forth the full path.

You can enhance this effect by increasing the number of steps in the blend or irresolute the size of the kickoff or 2d object. TheBlend Tool is highly interactive and will let you to run into the changes every bit you lot brand them.

Changes to the number of steps in the blend or to the offset or second object will return different results. Remember that you can as well move the nodes of the initial path and the alloy will follow these changes interactively too.

One time you're satisfied with the resulting blend and you no longer need to interactively alter its properties, y'all can delete the path. To do this, go to theObject carte du jour >Break Blend Apart. Then, click the path and remove it using theDelete central.
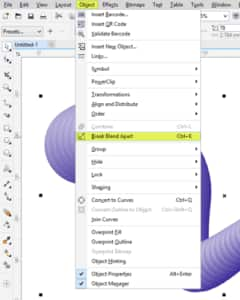
As you tin can see, theBlend Tool can be used to create three-dimensional furnishings. But why stop at that place. This same technique of fitting a blend to a path allows you to create a diverseness of shapes. Merely change the number of steps and the shape of the path or objects that will serve every bit path, and y'all will notice that you tin can create very interesting furnishings such as the 1 shown below.
—————
This tutorial has been produced by Anna María López López – multidisciplinary designer, founder of www.corelclub.org and author of numerous digital design books such as www.cursodisenografico.net.
Source: http://www.corelclub.org/tutorial-creando-formas-con-volumen-y-aspecto-3d/
Source: https://learn.corel.com/tutorials/creating-objects-with-volume-and-3d-appearance/
0 Response to "how to draw 3d in corel draw"
Post a Comment